Monday, February 27, 2012

I Can See Clearly Now

Actually, I have yet to clean the windows this year, so I can't see that clearly. haha But having the window trim all painted and looking nice certainly helps improve the view. Here's what I woke up to on Sunday morning:


Yay sunshine! I finished up the painting on Saturday. I ended up doing a coat of primer and then a coat of semigloss, then I realized the oils were seeping through and discoloring the paint, so I did another coat of primer, and then another coat of semigloss. And there's still one or two spots where I can see a super slight discoloration. Next time I need to paint over wood, I plan to try painting two coats of primer first and then letting it dry for 24 hours and then one or two coats of semi gloss, depending on how well the primer covers. I think getting really good coverage with the primer is the key here.

After all the painting was finished, Chris and I spent some time Sunday afternoon putting the finishing touches on a few things. He added a metal plate to the screen door latch he installed last week, so now we finally have a screen door that will stay closed. No more kitties sneaking out! Hurrah!

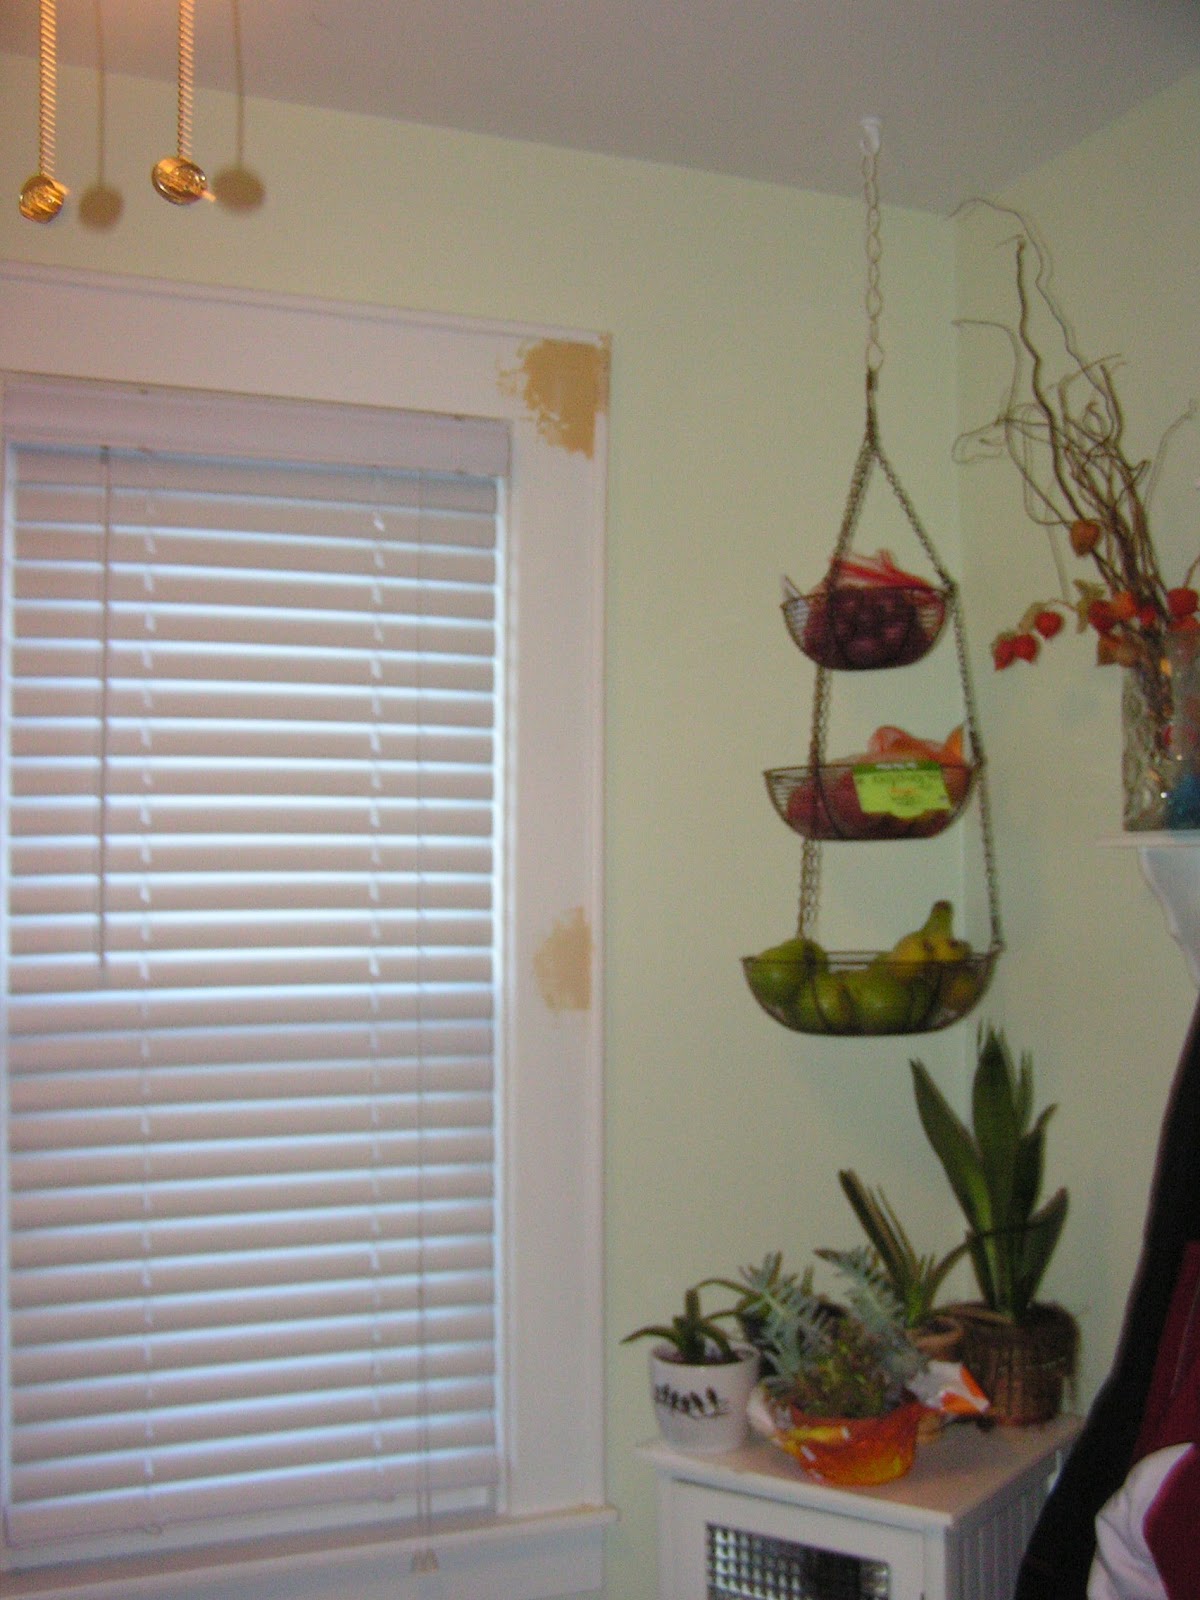
And I put up the blinds on the kitchen window. I really didn't want to clutter up my pretty, newly painted window, but we just needed our privacy. Luckily, I think it turned out great and doesn't add or take away much visually. Before, the metal mini blinds that were on this window were outside mounted, which meant that they stuck out past the window frame. Plus they were broken. So it wasn't a good look.


I also adjusted the lengths of the 3 pendant lights over the sink. The angled look just wasn't doing it for me anymore. I really like the clean, straight line they make now.


Sorry for all the dishes in the picture. It's the weekend, what can I say? Also, pretend our sickly little plant has lots of lush leaves on it. Hopefully it just has the winter blues and will be perking up in a few months.


As you can see from the picture below, I went with 2" blinds, which I think is a much nicer look. Also, the blinds are made out of a very water-resistant material, so it should hold up well in the kitchen. Each slat is very thick and has a faux-wood design, which you can't really see in the pictures, but definitely makes them look a little more high end. They weren't cheap (bought at Lowes) but I definitely think it was worth the money.

I also love the inside mounting. See how they line up perfectly with the edges of the window trim? Nice and clean. And no, they didn't just happen to be the perfect length for this window. I actually had to take about 2' of slats off the bottom, which wasn't too difficult but a little tedious. Then I shortened the pull cords, scraped off the orange warning stickers and we were in business.


Now if only that dishwasher was white ...


And here's my lovely kitty assistants once more showing off the new rug. They are clearly as obsessed with it as I am.

Pin It

Friday, February 24, 2012

A New Rug + A New Floor Plan = Progress

One of the rooms that looks the most different after all the furniture rearrnging is the dining room. I don't have a lot of good pictures of it before the makeover because honestly, it was just too cluttered. I just didn't want to document how bad it had gotten. But I took a few pictures before moving everything out.


Here's my lovely assistant Zoro showing off the new rug I bought at HomeGoods with a gift card that was a wedding present from Chris's coworker. Isn't it a gorgeous rug? We've had it down for about a week now, and I can confidently say that it's kitty tested and approved by all. Definitely doesn't show cat hair and lint as much as the old dark purple one.


And here's the room now:


We still need to find a place for the dust buster to live, and the safe needs to go somewhere ... well, safe. And yes, that is a marine battery sitting in the middle of the floor. And some odd decorative items and lamps. And an extra phone table and an extra chair. OK so clearly this room is nowhere near done. But if I waited until it was to put up pictures, I'd probably never be able to post anything.


Minus the little extras, the room definitely feels way more open and calming without the dining room table in the middle of the room. We tucked it in the corner next to the staircase, but right now the security camera is positioned on a tv tray, so it's not quite where it should be. And we now have no place for some artwork and a mirror that was on the wall before. Still working on that.


Oh, and see that pretty apothecary jar on the table? I'm going to turn it into a terrarium. I'm obsessed with the one Chris bought me for Christmas. I keep it at my desk at work, which makes me happy to have a little bit of nature with me in my windowless room, but then I don't get to enjoy it at home. So this jar with a lid should be perfect for home since it'll keep the kitties out. :-)

Messy, But Still Progress

In addition to all the other craziness going on, Chris and I decided it was time to finally pick up the house and get it looking nice again. I took it a step further and decided to move about 75% of all the furniture in our house into a new location.

So before I reveal the pictures of the living room now, let's look back at what it looked like last week:


The mirror at the left of this picture is just temporarily hanging out there until I can find it a new home.
  
Since we started playing Star Wars: The Old Republic, I realized that my existing computer setup where I sat on the couch and played with my monitor on a tv tray just wasn't cutting it. My shoulders and back were killing me. So we temporarily moved my writing desk into the living room in the only spot that had room: right in front of the big picture window. And by temporarily, I mean for 3 months. Yikes.

 So this week we finally got on that little issue and this is what we have now:


Much much better. I still have to change out the wall hangings and see if I can conceal the cords a little better, but it's nice that I'm no longer blocking the view and squinting into the sunlight. Sorry that I didn't stage this photo and make it look pretty like a home in a magazine. I just don't have the energy right now. But try to visualize it without all the clutter and I think you'll be impressed. haha


Chris promises me he'll take the blue computer downstairs as soon as he finishes backing it up. We'll see. lol
 We finally got our wedding pictures up on the wall.


I got rid of the end tables (one which was made of a stack of books, haha) so now either side of the couch is open and airy. I might like to get a large basket with a lid to store the extra blankets when not in use for the right side of the couch though.


The other end table got moved over here and is now a printer table for Chris. I just didn't have anywhere else to put it, so we'll see how that works out.


But at least the window is clear again. It's nice to get a little light in here.
Pin It

Thursday, February 23, 2012

Patch, Prime and Paint the Kitchen Trim

Part of the reason the bookshelf project isn't finished yet is that I've been dealing with repairing trim after the break-in and just cleaning up the house. When the cops were in our house after the burglary, they kept asking "So ... did they move anything in here or was this like that before?" That's when we realized how messy and disorganized our house had gotten. If you can't tell whether or not a house has been ransacked by a hasty thief, you've got a problem.

But back to the kitchen. I thought I'd be able to knock out the trim painting last night, but the oils in the wood trim around the sink were seeping through the primer and top coat and turning things yellow, so I had to add another layer of primer and let that dry overnight. Hopefully we'll get this finished off tonight. But doesn't it already look so much better?


Please excuse the bad lighting. I finished up at about 10pm last night. I'll post better/daytime pics soon.

Remember what the window looked like before?

How about before that? So dark and woody!

Basically, I'm pretty happy with the way it's turning out already. Even with paint cans and mess everywhere. The white trim just looks a lot fresher and more modern. And now it matches the other window with it's touch-up job, pictured below.


 And look! From back here it actually looks like the door trim is as good as before the burglary.

Unfortunately, if you look closer, you can see that I wasn't able to get it toally smooth. The combination of hammering from the contractors, paint chipping off and my inexperienced hand trying to build it all back up with wood filler did not equal total success. But it's better than just after the break in, so I'll take what I can get.

Isn't the new door knob pretty, though?

Pin It

Wednesday, February 22, 2012

The Great Bookcase Project Continues (Part 3)

I'm far from finished organizing the bookshelves in the spare room, but I figured I was overdue for an update. They still look sort of messy, so I'm hoping to figure out a way to add a little calm to them, either by weeding out extra items or just making things more symmetrical. But I've added a few new things in the rest of the room, as well.

Chris and I brought his old desk down from where it was temporarily living in our bedroom and I hung our diplomas up (they've been on the floor in the living room for way too long). Although looking at this picture, I may need to center them over the desk, rather than on the wall.


Chris's crazy subwoofer now has a little cave to hide in. haha


Pay no attention to the teddy bears or the mess in the metal 3-tiered tray. Work in progress, people.
 We finally made a trip to Michaels and bought the glass, backer and hanging kit we needed to frame our wedding tree with the antique frame we used in our engagement pictures. For those who didn't attend our receptions and don't know what the wedding tree is, it's basically a print of a tree trunk and bare branches. We had our guests stamp their thumbprints around the branches to make little leaves, and then they signed their names under their thumbprints, rather than using a guest book. It turned out gorgeous!


Our wedding tree.

I still haven't attached the new latches that will hopefully hold the upper drawer in place. Right now it's basically balanced in the upright position. Also, the wizard candles may get moved elsewhere ...


This one needs some work. A little overwhelming right now.


So that's where we are right now. Definitely heading in the right direction.
Pin It

Monday, February 20, 2012

We Got Robbed!

No, really. Someone kicked in our door and robbed our house! I hate people. And for a while we thought two of the cats got out (Oreo and Shadow). We found Oreo right away running around in the driveway, but we couldn't find Shadow, our little scaredy cat that's never been outside at our house. He was missing for 36 hours (36 long hours of searching the house and the neighborhood, creating a heated bed for him outside and other ridiculousness) before he suddenly reappeared in my desk chair one morning. So we were glad we didn't lose a kitty on top of everything else.

We were able to get some contractors out the next day to repair the door frame and reinforce it so it's stronger than ever. We even put on new handles and locks for added security. So hopefully if this jerk tries it again, he'll just break his stupid foot. I didn't take any pictures of the busted up door frame, but I did snap a picture of my work in progress on repairing the trim. The contractors did a great job with the structural repairs, but they left it looking pretty rough. Paint was chipping off from where they hammered and where the burglar splintered the wood and there were holes where all the screws went in. Here's an in-progress shot of my repair work.

You can sort of see our pretty new oil-rubbed bronze handle and deadbolt on the door.
 I ended up chipping off most of the paint on that piece of trim and then building up the divots from the hammering with wood filler. I also smathered it around anywhere the paint met the wood so there wouldn't be raised ridges. Hopefully I can get it all sanded out smooth tonight and apply some primer.

I decided since I had the tools all out, I might as well touch up the nail holes and such around the two kitchen windows. I was planning on changing the window treatments anyway, so why not now? I took down the broken mini blinds on the window of the sink, as well as the shower curtain window treatments I made for free when we first moved in.


So here's where I'm at now.


It's amazing how much bigger the kitchen feels with this window open like that. If we didn't like our privacy so much, I'd be tempted to not put up any blinds or curtains at all.


The window sill was all scratched up from kitties and 82 years of use, so I filled in those holes as well.

I purchased some new blinds for the window over the sink. The old ones were metal mini blinds that were broken on one side, so obviously even a bare window is an upgrade. haha But the new ones are 2" white ones with a faux-wood design and they should match the other kitchen windows much better. I might stop there and leave it otherwise open since I like how big the room feels without window treatments. But we'll see how it looks once it's all painted and the blinds are hung. Also, I'm hoping to replace the blinds on the door with a curtain, since the blinds bang against the door everytime you open or close it, which is a little annoying. But I'll probably pick that out once I decide on a color for the door.

For now, I'm just happy to have a secure door that will hopefully keep those boogeymen out!
Pin It

Monday, February 6, 2012

The Great Bookcase Project Continues (Part 2)

Spurred on by a very messy house, Chris and I finally decided to dedicate a little time to getting the great bookcase project finished up. In the interest of saving time and possibly reusing these bookcases in a future home, we decided not to take the Dremmel to the lower bottom portions of the bookcases. This would have made them stand flush against the wall with cutouts for the large baseboard trim, but we came up with a decent alternative: move the bookcases to the back wall so you can't see that they're not flush against the wall. Ta da!


This is still an in-progress picture. We've attached a few of the MDF shelves to supplement the wood shelves that were already in place, but still have a few shelves to go. You can see Oreo is laying on one such shelf, generously offering to test it for durability. We are now 100% certain the new shelves can old up to 11 pounds. haha


Oh Meowface.


Here you can see that we have all the new shelves attached. Can you spot the MDF ones? Yeah, we can't either.
  I didn't patch the electronics holes that the previous owner cut in the back panels because I'm hoping once these bad boys are all loaded up, you won't even be able to see them. If they are a problem, I'll have to go back and patch them up.

We only goofed up on one shelf, but luckily it was one we installed behind the cabinet doors, so you can't see just how crooked it is unless you open the cabinet doors. It still does it's job ... as long as we don't store marbles on it. hahah


The right bookcase looks really crammed up against the window in the picture, but it's really about 6" away. I might end up splitting the curtains in half so a panel hangs on each side of the window and you can see more of the pretty pattern in the room.


You can see that's there a couple feet between the tops of the bookcases and the ceiling. I've already got plans to display some of my pretty birdcages up there.


Now we just have to get these guys loaded up with the various objects scattered throughout our home that currently have no place to live. Where to begin ....

Vacation Jars

I got this idea from younghouselove.com, who in turn got it from a Pottery Barn catalogue, but I am absolutely loving it. The idea is to commemorate each vacation you take by storing small mementos and souvenirs in a jar - one for each vacation. In PB and YHL, they used canning jars, but since I'm an avid candle burner, I had a lot of these pretty glass candle jars laying around the house. 

Eventually I'll label each one (maybe if I get a label maker as a birthday or Christmas present? lol) but since I've only made three, it's pretty easy to keep track of them. I still need to go through some boxes and see if I can find a few souvenirs from other trips we've taken together, but I'd say we're off to a good start.


This is our most recent trip - our honeymoon to Cancun, Playa del Carmen and Tulum, Mexico. Part of the beauty of these dynamic little jars is that you can move them around to see different objects. From this angle, you can see the sand and some shells we took from the beach in Playa del Carmen, as well as an owl whistle Chris bought me at a stand outside the natural aquarium, tickets to Tulum and more.


This jar is for our vacation/wedding trip to Disney World last October. There's a champagne cork from the bottle that was waiting in our hotel room upon our arrival, my garter that Katie got me, Chris's boutonniere, park tickets, a Mickey Mouse design and more.


This sleek little jar is from our trip to New York City when we got engaged in March 2010. I like that this one has lots of sharp lines and simple objects. Even the design of it reminds me of NYC. This one has a cork from the bottle of wine we had at dinner the night Chris popped the question, the ring box, the key card to our hotel, ticket stubs to a museum and a Broadway play and more.
 Isn't that just the cutest idea? I used to always put mementos in scrapbooks or boxes that I almost never look at, but this is way better. Now we can see the souvenirs all the time and be reminded of our favorite trips together. I'm looking forward to putting together more of these vacation jars from past and future trips. I also have small- and medium-size versions of these jars, which could be cute for a weekend trip or a vacation with only a couple souvenirs.